
 no reviews
Iron skillet purchasing advice: how to choose the right product
- What you need to know
- Iron pans are suitable for fierce frying as well as gentle cooking.
- Over time, iron pans develop a patina which helps to give food a roasted flavour.
- Thanks to their material, these pans are extremely sturdy and reliable.
- Iron pans are not dishwasher suitable and must instead be washed by hand.
Iron pans — robust and versatile
Iron pans are a tried-and-tested kitchen utensil. The stand-out feature of an iron pan is its robustness. In fact, an iron pan can last you an entire lifetime. When used correctly, their quality won’t deteriorate over time. Unlike with other pans, the more an iron pan is used, the more the patina builds up, giving the effect of a non-stick layer.
Iron pans can be heated to extremely high temperatures. Professional cooks swear by them, as they allow food to be fried to exacting standards. They are also especially good for dishes which need to be cooked evenly. Due to their thickness, iron pans retain heat for a long time, making them ideal for cooking meat.
Another advantage is the versatility of iron pans. They can be used on any type of stove — be it electric, gas, or induction. Anyone that enjoys a rustic feeling, can even use iron pans over an open flame. If they are made entirely from iron, they can also be used in the oven.
However, chefs don’t always get the best results from their iron pans at the first attempt. Only after a few uses do dishes begin to get their characteristic fried taste. This is partly due to the fact that iron pans don’t have a protective coating. Instead, this coating process takes place during the so-called seasoning process. Once a pan is seasoned, it becomes easy to clean. Oftentimes it is sufficient to simply rinse it. Iron is prone to rust, which means that, during cleaning, water should be used sparingly. A downside of iron pans is their weight. Most models come in at around 1.5kg.
Heat-retaining properties of iron pans
In comparison to copper or aluminium, iron is a poor conductor of heat. This is why iron pans take so long to heat up. Depending on the type of stove, there can be large temperature differences between the centre and the edge of the pan. This is especially true of gas stoves, as the flame is often only concentrated on one particular part of the pan. With electric and induction stoves, the temperature difference is much less noticeable. For this reason, iron pans are particularly well suited to use on these stove types. Due to the thickness of the material, iron pans take a long time to heat up, however they retain heat for a lot longer than other pans. Depending on what you’re cooking, this can be a big advantage.
Types of iron pan
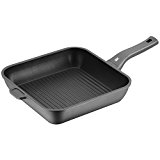
There are two main types of iron pan: cast-iron and wrought-iron. The two types differ somewhat in the way that they cook and in how they should be used.
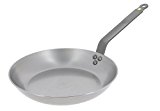
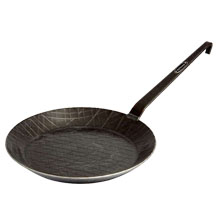
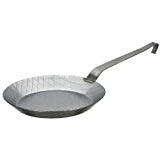
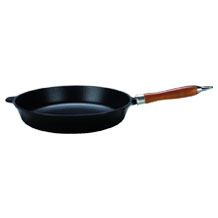
Wrought-iron pans
Wrought-iron pans are made from a single sheet of metal. They are thinner and therefore a little bit lighter than cast-iron pans. This makes them easier to handle while cooking.
Due to the manufacturing process, the base of a wrought-iron pan can have certain markings. This causes heat to be conducted unevenly. Often the pan is significantly hotter in the middle than on the sides. When used incorrectly, wrought-iron pans can warp. For instance, this can occur, if they are left on a hot stove. Users should make sure to keep their pans in the middle of the stove and never on a burner that is smaller than the pan itself.
Just as with cast-iron pans, wrought-iron pans are scratch and cut proof. After a few uses, they also develop the characteristic patina.
Advantages
- Long lifespan
- Lightweight
- Good for searing
Disadvantages
- Uneven temperature distribution
- Potential warping of the base
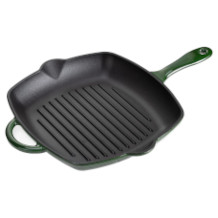
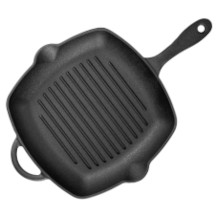
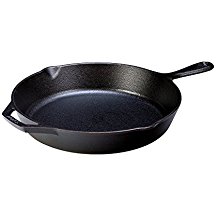
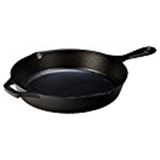
Cast-iron pans
Cast-iron pans are cast and then mechanically formed into shape. They are thick and heavy and accordingly robust. The are significantly heavier than other pans and, as a result, they can take some getting used to. They are, however, completely scratch resistant and heatproof. In contrast to wrought-iron pans, they do not deform, even under high temperatures.
The thick base of a cast-iron pan allows for an even distribution of heat so that the food cooks evenly in every part of the pan. A patina is a typical characteristic of a cast-iron pan, giving the pan a non-stick layer and contributing to a distinctive seared taste.
Advantages
- Very long lifespan
- Sturdy material
- Even temperature distribution
- Also suitable for searing
Disadvantages
- Heavyweight
What to look out for
Before buying a pan, you should first think about what you want to use it for. The size of the pan should be based on the size of your household. A large pan is, however, correspondingly heavy. Iron pans should always have a stable handle, whatever the size.
Weight
An iron pan is significantly heavier than other pans. Those looking to buy the lightest iron pan possible should opt for a wrought-iron version over a cast-iron one. Wrought-iron pans mostly weigh between 1.5kg and 2.0kg, while cast-iron pans often weigh more than 4.0kg. Cooking with cast-iron pans takes a lot of energy and is difficult to do with only one hand. The advantage of a heavy pan is that it is more stable than a lighter pan.
Diameter
The diameter is an important criterion for iron pans. Not fitting correctly on the stovetop can affect the heat conduction to such an extent that the pan becomes permanently deformed. Make sure that the pan isn’t too big and sits at most two centimetres above the stove. With round pans, the diameter refers to the distance from one upper edge to the other side. It’s also worth noting that the diameter of the upper edge is usually larger than that of the base. For an optimal heat distribution, the heat source should be around the same size as the base of the pan.
A diameter of 28cm is the standard pan size for households of between three and five people. Pans with a diameter of 20cm to 24cm are best for single households. Pots and pans with a diameter of more than 32cm are usually only used in professional kitchens.
Pan handle
The pan handle determines how easily the pan can be used. Without a handle, a pan would be all but useless. It’s for this reason that the handle must be sturdy and durable. A handle is made from either plastic, metal, or wood.
Plastic handles are commonly used because they are poor heat conductors. Plastic is, however, liable to deforming or even melting when exposed to extremely high temperatures. For this reason, plastic handles are not suitable for use in the oven or directly over a flame.
Stainless-steel and iron handles have the advantage that they can withstand the high temperatures of an oven. During use on a stovetop, stainless steel is cooler to the touch than iron, however both are good conductors of heat. It is, therefore, always recommended to take extra care with metal handles by using oven gloves or a cloth.
Many higher-quality pans are equipped with wooden handles. A major advantage of using wood is that, like plastic, it doesn’t conduct heat. Wooden handles are, however, flammable — meaning that they shouldn’t be used in the oven.
Due to the weight of iron pans, it’s important that the handle is securely fastened to the pan itself. No one wants a handle to suddenly break off and damage the stove or floor. Particularly susceptible to this kind of breakage are plastic handles which attach to the iron pan with a screw. Luckily, these are not very common. Most iron pans have a metal handle which attaches to the pan with a rivet. This type of connection is usually quite stable, although it can become loose over time in poor quality models. Wrought-iron pans usually have a handle which is welded onto the pan itself — it is very unlikely that this kind of connection gets broken. Similarly, there are also lots of cast-iron pans with handle and pan elements that are cast out of a single mould.
Pan height
The height of the edges of a pan determines its volume. Pans with higher edges are often considered more comfortable to cook with. A pan with high edges allows you to cook extra amounts of vegetables or sauce in one go. Thy also offer a certain anti-splatter protection, resulting in less cleaning after cooking. A little pouring rim makes it easier to pour out the contents once cooked. Pans with lower edges are particularly good for presenting dishes directly on the table. A crêpe pan has particularly low edges, while casserole pans, fish pans, and sauté pans have the highest.
Some useful tips
Those buying an iron pan for the first time are bound to have questions about how best to use it. As a first step, seasoning the pan takes a little patience and preparation. The culinary experience that comes from putting in this effort is, however, worthwhile. When maintaining an iron pan, it is best to stay completely clear of using chemical cleaning products.
Seasoning instructions
When looking for information about iron pans, you are bound to come across the term ‘seasoning’. A new iron pan does not have non-stick protection. Instead, it is created through use. Seasoning uses oil and heat to create a film (or a so-called patina) on the surface of the pan. This layer is not as effective as teflon or ceramic, although it lasts longer and, if damaged, can simply be reapplied. For this, all that is needed is linseed oil, aluminium foil, kitchen towels and an oven. A more detailed description of the process can be found online.
Removing the corrosion protection
New pans often have a protective layer made from olive oil or beeswax to better protect the pan from rust and dirt during storage. A patina cannot form over the top of this layer. For seasoning, a rough surface is preferable. Thus, the layer of corrosion protection must first be removed.
The best way to do this is to soak the pan in dish soap for 30 to 60 minutes before washing it thoroughly. Alternatively, you can clean the pan by hand with the abrasive side of the sponge. If you have the feeling that there is still something left in the pan, it can help to heat the pan with large grains of salt before scrubbing them out.
Drying a pan in the oven
The outer surface of an iron pan is not perfectly flat. Tiny bits of water can collect in the uneven surface. Water underneath the patina can lead to a build-up of rust. For this reason, the pan must be absolutely dry before it is seasoned. Put the pan in the oven and heat it to more than 100°C. Remove the pan from the oven with oven gloves as soon as it has reached the desired temperature. You can leave the oven on after this step as it will be needed again right away.
Rub linseed oil into the pan
Firstly, shake the linseed oil to ensure that sediment from the bottom is mixed into the rest of the oil. Blot a good amount of the oil onto a piece of kitchen paper, then rub the entire interior of the pan with oil. Repeat this process until the pan is shiny. Once complete, take a fresh paper towel and wipe the oil out again. You should be so thorough as to make sure that the pan looks as though it had never come into contact with any oil in the first place. This step may seem counter-intuitive, but the iron has a porous surface which retains oil, even once it has been wiped away. It is this retained oil that will form the basis for the patina.
Season the pan in the oven
Now begins the real seasoning. The oven method has the advantage that it doesn’t create smoke. Turn the oven to 250°C and put the pan in facing upside down. Lay some aluminium foil underneath to catch any oil droplets that may run off from the pan. Leave the pan in there for an hour, starting when the oven reaches its required temperature. Next, turn off the oven but leave the pan inside for another 30 minutes until it has cooled down.
Repeat the procedure
It is probable that you will have to repeat the last steps a few times in order to create the desired seared effect. After a single seasoning, the patina is not particularly sturdy. Depending on the method employed, an iron pan may have to be seasoned up to six times until a consistent coating is formed. A finished patina is evenly black and shines a little bit.
Cleaning an iron pan
Even indestructible iron pans need to be cleaned regularly. There are two common mistakes which people often make when cleaning their pans. After the first seasoning, an iron pan should no longer be cleaned with washing-up liquid, as this damages the built up non-stick layer. Furthermore, iron pans should never be washed in the dishwasher. It’s also not advisable to soak an iron pan for more than a few minutes at a time as this can cause rusting. After every use, make sure to clean your pan thoroughly but gently.
- Let the pan cool down.
- If necessary, wash out the cooled pan with a little water.
- Wipe out the interior with a paper towel.
- Where necessary, use a mix of oil and salt for this cleaning step.
- Make sure to dry the pan thoroughly.
- Rub down the pan once again with a little oil.
The last rubbing down with oil helps to prevent the build-up of rust. If correctly looked after, an iron pan can last for many years.
Which types of oil are best for frying?
Lots of chefs prefer to use iron pans because they are especially effective for searing at high temperatures. For this, it is important to choose the correct kind of oil, as not all oils and fats are suitable for being heated above 200°C. An example of this would be native or cold-pressed olive oil. If these oils are heated too much, they can release harmful smoke. It is therefore important to be aware of the smoke pointof an oil. This is the lowest temperature at which a visible smoke starts to form over heated oil. For searing in an iron pan, refined oils and fats with a high percentage of saturated and simple-unsaturated fatty acids with a smoke point of over 200°C are recommended. Clarified butter and rapeseed oil are suitable for temperatures upwards of 205°C.
Image 1: © kab-vision/ stock.adobe.com | Image 2: © fahrwasser / stock.adobe.com | Image 3: © HLPhoto / stock.adobe.com